Excel sheets with info

Excel sheets

All things growing in the Garden>AA2020 Plant List & Care

All things growing in the Garden>2018 Portmarnock Garden>Whats growing in Portmarnock

Tuesday, 9 October 2018

Lemon Lisbon - Grafted Dwarf

We share a brick wall with our neighbours, it creates what will be a lovely courtyard effect along the side of our home, just perfect for growing citrus.  So when not long after moving in, in early 2017, Grafted Dwarf Citrus came available at Aldi.  I snaffled a Lisbon Lemon grafted onto Flying Dragon Rootstock- supposedly the best rootstock for dwarf citrus varieties.
Mind you, a bit of research and a closer look at the wee plant would have been a good idea, it has thorns, great long sharp vicious things, making it a mission to cut the rotters off but they are awfully well camoflaged.

Dwarf Citrus on Flying Dragon Rootstock: prefers warm sunny position. Ideal for small gardens, courtyards or tubs and planter boxes.
Potting advice:  Place small quantity of potting mix in pot, remove plant from container, place in pot, keep bud union 10cm above soil level
Planting Advice:  Dig hole slightly larger than root system.  Remove tree from container, place in hole, keeping bud union at least 10cm above sil level.  Fill with soil, leave no air pockets
Caring for tree:  Feed within the dripline of tree with a slow release complete fertiliser or citrus food in late Winter and late Summer.  Mulch well.
Height to 1.5m x Width 1m
Full Sun
Ideal for Pots
Well drained soil.


Popped the seedling into a pot and proceeded to ignore it for a year, the only care it got was a watering from the Darling.
An inspection found the Lemon struggling with a massive number of scale and ants as well as black mould.  Thoroughly sprayed it all over with white oil (home made) and gave it a bit of complete fertiliser and it rewarded us with a burst of new growth.
Over the past 18 months it has doubled in size and with the new growth is now beginning to thicken up.  The white oil had an effect on the new leaves, but they seem to have recovered and there are also quite a few flower buds on the tree.


Now is not the time to prune and shape but will keep an eye on new growth and pinch off the spines while they are new and soft.  It will be getting another dose of white oil next week as there are still a few scale on board.
Have read to expect 3 lots of bud drop as being natural, so not removing any just yet, adopting a wait and see approach. 

16-10-18.  That bud above has formed into a lemon, there is one more on the tree, yep, two lemons.
 18-10-20  Sprayed with White Oil (home made)


20-10-18
The two lemons continue to swell, the rains do not seem to have effected the lemon tree.  It is just starting to send out new growth

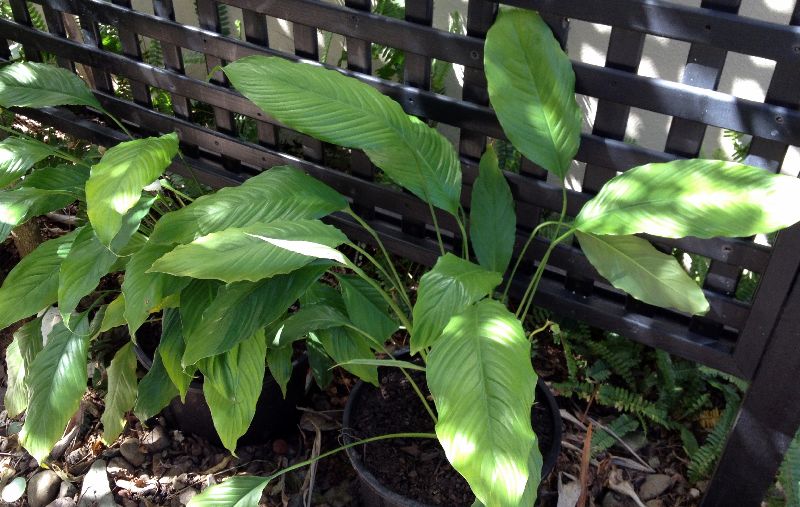
Peace Lilly - Spathiphyllum

A few years back we were given a Peace Lilly to look after for awhile by our Son, well I guess it has slipped under his radar but as it was getting a bit pot bound.

Plan is to buy a few large square pots and grow an assortment of green leaves in front of the trellis, the little cheapie pots are just a way of getting us started on the project.
The entire garden area of our new home has had weed mat layed down with stones on top, the soil leaves a bit a lot to be desired so in the short (and even possibly the long) term we will be gardening in pots.
When we arrived in Portmarnock we popped the peace lilly against the fence on the 'utility' side of the house, being careful to make sure it wasn't getting blasted by the air conditioner unit.  What we didn't realise was that on the other side of the gappy fence was a pool filter motor.  Well, by the time we realised it was there the peace lilly thought it was in 7th heaven.  It loved the daily warm breeze floating through the fence.
So much so that it quickly became rather root bound and began to suffer, dividing up was the only solution.
We got 4 good sized pots and one smaller pot for Riley next door - Riley is a grade 3 young man just beginning to discover the delights of gardening - a good watering in with Seasol and daily waterings since and every pot seems to be growing happily.


 Plan is to get the square pots and re-pot the peace lillies along with the Diamantina Agathe, that red flower you can see near the end, and perhaps a white Agathe on the right of the Duranta with some hardy ground cover to grow up in front of the pots so that they will not be so noticeable, perhaps some green Mondo, although I did pull up a tangle of spider plants that have gone to a little 'recovery nursery' spot by the side fence, so they may come in handy.  We will source a couple of pots or coir basket liners to go in the hangers on the trellis (barely visible behind the Duranta trunk).  The Duranta had to have a severe trim back, it was growing over the neighbours and our gutters, but it will reshoot in time for a nice spring & summer display. (Fingers crossed here)
Amazingly, there was a mess of Spider plants, Bromeliads and Fish Ferns growing at the base of the trellis, in very little soil on top of the weed mat and amongst the rocks, everything was a home to the ants (a real problem here) and in very poor health.  Have cleaned all the plants up and put them into little 'recovery nurseries' so some may be reclaimed, some maybe not. Time will tell.


Funny how you change your mind as you go along.  The buying of expensive pots for the Lillies has been put on hold until there is a bit more structure in the garden.
For the time being the existing pots will have to do.  We were gifted some lovely new grow pots, some of which were only 4.5" wide, perfect to plop in six of the spider plants who had flourished in their little 'recovery nursery'.  Scraped the rocks back from the edge of the footpath and placed the little pots on the weed mat, scraped the rocks back and hopefully the spider plants will thicken up and cover the grow pots until we can get some other pots.


20-10-18
Peace Lillies are thickening up, showing more flowers
The left had side of Trellis area, this area got the smaller plants along with Darren's original Pot.  One day that pot is gonna go to its rightful home, by then I hope to have a fill in ready to fill the vacant spot.
The right hand side of Trellis area, 2 reasonable sized peace lillies with the new addition of Quisqualis 'Jessies' Star' climber, which is yet to begin climbing.
Spider plants in 4" pots have sparked up since their 2nd repotting in a couple of months.

Brunsfelsia

We pruned out the scrappy twigs and tidied up the top growth of the Brunsfelsia in August.  Too late in the year, we have no flowers on the new growth.
First flush of flowers 3-9-18

 More flowers are blooming every day.  The plant has a heavy perfume, pleasant but heavy, would not want it close to an open door or window.
Need to research proper pruning techniques and times.
Fed with granulated fertiliser  2nd week of September '18.  So far no bugs

20-10-18
Greg decided that the Brusfelsia needed a shaping prune.  It is a much better shape for the position, but no more flowers.

PHLOX, mixed - Phlox drummondii

Phlox is one of the brightest summer flowers.  This dwarf beauty type produces a carpet of charming mixed flowers with eyes in pastel shades.
Pholmans Phlow Mixed is idea for bedding borders, mass plantings, rockeries and containers.
Growing.  Easy to grow, preferring a well drained soil or a standard approved potting mix.  Through the warmer months mulch around the plants root base to reduce water stress.  Removing spent flowers will prolong bloom period and encourage more flowers.
Flowers in 10-12 weeks, Full Sun, to 25cm H and plant 25cm apart.

Liked the look of the flowers pictured on the plant label, knew absolutely nothing about them apart from the fact that they were on the 'reduced' table at Bunnings and therefore, cheap as chips, seems I have stumbled onto a real bargain.....update: https://www.gardensonline.com.au/GardenShed/PlantFinder/Show_1107.aspx  states that phlox drummondii is an annual ??


 13-7-18
This is where a little knowledge would have been good, seedlings should have been pinched back and mulched.

Planted in the round self watering pot as a bit of temporary colour before turning the pot over to veg I now have to souce another pot for the veg...gee what a hardship!
Lack of knowledge has given these a bit of a rocky start, so some work will have to be done to make sure that they survive and continue to grow healthily.


 5-8-18
Starting to flower and trail over edge of pot.
From the A.B.C. site    http://www.abc.net.au/gardening/plant-finder/phlox/9441452
Phlox are a variable group, ranging from carpeting rockery groundcovers through wiry-stemmed trailers to large bushy perennials with strongly erect stems.   They all bear clusters of similar flowers, which are small, long tubed, widely flared, bell-shaped, slightly fragrant, and grow in brightly coloured sprays. Pink to purple and white are the predominant flower colours, and the blooming season ranges from spring to autumn depending on the species.


18-8-18
Flowering nicely, at this is the time I should have been on the ball about deadheading the plants and pinching back growing tips
From Garden Master
As sun lovers, Phlox can be used as an alternative to both pansies and petunias and will make an excellent spring show. In subtropical areas or where the winter is mild, they will flower through winter and some varieties are so heat tolerant that they will continue to grow and flower through to December and even January.
Seedlings should be planted 20 to 25 cm apart to allow the air to circulate, because phlox are susceptible to powdery mildew when densely planted.
If you have bought seedlings that are in flower, remove the flowers because the plant needs all its energy to establish its roots. Once the roots are established the energy will go into the leaves and new flowers.
Once they start flowering regularly, remove the dead blooms so that they will continue to flower.
Don't be afraid to cut them back by a third after their first flush. This encourages the plants to get fuller, which increases the amount of flowers.
Phlox don't like wet feet and, like petunias, they like regular but not abundant watering. In water-wise terms zone them with other drought tolerant plants.

Good idea!
All phlox grow well in containers and a super winter combination would be phlox and pansies with daffodils in the centre for height. If planted in a hanging basket, mix some slow release fertiliser into the potting soil and even some water retaining granules. Water the hanging basket every second day in winter but step that up as the temperature rises.

  10-9-18
A nice showing of flowers, but close examination shows all the spent flower heads that should have been snipped off the plant. 


From Gardening Know How:

 https://www.gardeningknowhow.com/ornamental/flowers/phlox/dividing-phlox-plants.htm
 Perennials, like phlox, need dividing every few years for many reasons – to keep them in control, to rejuvenate them or just to create more plants for other garden spots. So, how do you know when to divide phlox plants? As a general rule, phlox plant division can be done every two to four years in spring or Autumn. When diving phlox in spring, it should be done just as the new shoots appear.

A little preparation is required before dividing phlox plants. About 24 hours before phlox plant division, water the plants deeply and thoroughly. You should also prepare the site for the divisions, loosen up the soil and add any required amendments. Phlox plant divisions should be planted immediately, but they can be planted in pots with potting mix temporarily to give to friends and neighbors.
To divide phlox, cut around the root ball with a sharp spade, then gently lift the plant out from the ground. Remove excess dirt from the roots. Separate the roots into sections with three or more shoots and adequate roots with a sharp, clean knife. Plant these new divisions immediately and water them thoroughly. Watering with a rooting fertilizer can help reduce stress for the plants and encourage quick rooting.


  21-9-18
Plants now leggy, yellowing leaves are perhaps from only being watered every second day...perhaps.  Fertilised 2nd week in September with Osmocote.

22-9-18
Time for a little TLC, snipped off the spent flower heads and cut back some of the long stems, but couldn't bring myself to snip them all back, most of them have flower heads forming, but did notice that there were a lot of roots showing, covered them with a fine layer of potting mix, idea being that it would be better to be a gradual addition instead of a thick layer burying part of the plants stems at ground level, don't want to set up a situation for powdery mildew.

https://www.gardeningknowhow.com/ornamental/flowers/phlox/growing-garden-phlox.htm

Care of garden phlox also includes the clipping of flower stems after the flowers fade. This keeps the plants looking tidy, and also prevents the flowers from dropping seeds. Since garden phlox plants are generally hybrids, the seedlings that result from dropped seeds won’t resemble the parent plants. Many people wonder how to grow tall garden phlox. To get the maximum height from tall garden phlox, clip the weakest stems from the plant when they are about 6 inches tall, leaving only five or six stems on the plant. Pinch out the tips of the remaining stems to encourage a tall, bushy growth habit

20-10-18
After a bit of an experimental cut back, the phlox seem to be flowering well but generally going downhill with the yellowing of leaves.  When flowers are spent will cut right back.
 
 
20th Oct 2020
These phlox come back year after year, This year, for some strange reason they seemed to be continually getting caught up and pulled from the pot, end result is that all the phlox are now dead December 2020.  Will buy another punnet when I see them again.  Originally purchased from Bunnings, they made a lovely trailing show.


SNO PEAS

18-8-18   Planted Sno Pea seeds in large square pot, 2 seeds in each spot, 3 spots along each side.
24-8-18   Seedlings emerged.  Thinned to 10 plants.


3-9-18
Peas have emerged, all planted emerged so had to thin, next pot to plant will only plant one seed per position with one spare seed in center.

10-9-18 
Seedlings climbing, tendrils looking for supports,will try the plastic poles I have.

 21-9-18
Plastic poles installed, with twine, poles are not long enough for proper support, need to get timber stakes.
 22-9-18   Noticed first pea flower is forming on one corner plant.
2nd week September, fertilised with osmocote.


7-10-18 
Plants have bushed up nicely, pea flower buds beginning to swell.  Next planting definitely need a better quality stake for supports.


16-10-18
Pods have appeared, lots of flowers still coming.
Still needing better - longer supports.

18-10-18  Hopeful with all the rain that fungus does not appear, will milk spray when weather clears.

20-10-18
Planted new pot of pea seeds, one seed per place, in front of stake. Planted one pea in center of pot as spare.

25-10-18
Lift off...baby pea plants emerging - funny thing is only one seed planted in front of each stake, but one stake has two plants emerging while at this point, nothing on the next site along.  seed migration??


HERBS in a BARREL

26-12-17 
A Christmas pressy from Shane, Shell, Declan and Beau, all Beau's idea.  He knows what his Grandma likes, bless him...

 Sage, Oregano, Thyme, Dill with Garlic Chives in the center.


 being duly admired by Sam in his summer coat.

5-8-18  
Lot of sinking of soil, will have to raise levels.  Dill decided to turn up its toes, as dill is wont to do.  Sage needs attention:


  From the site: https://www.thekitchn.com/everything-you-need-to-know-about-growing-sage-221035
Growing garden sage (salvia officinalis) is so economical and time-saving. Its flavor is so intense that only a dash is needed to flavor a dish. Sage is also one of the few herbs that, **even as its leaves grow larger, the flavor intensifies. Unlike many herbs, sage leaves are still delicious after the plant flowers. 
Sage will grow almost anywhere, but it provides the tastiest leaf when it receives a lot of sunlight.

Propagate from cuttings: Clip a three-inch cutting from the very tip of a stem, apply rooting hormone on the exposed portion of the stem, and plant it in either sterile sand or vermiculite. Roots will emerge within six weeks. Transfer to a small pot, let the root ball form, and then transfer to a large pot or directly to your garden.
Propagate by layering: Take a long sage stem and carefully secure it along the soil with wire, leaving four inches of the tip free. Make sure the pinned portion is directly touching the soil. Roots will start to form along the stem within about a month. Cut away the newly rooted plant from the main plant and transfer elsewhere within the garden or to a large pot.

From the site: https://homeguides.sfgate.com/prune-culinary-sage-37857.html
 Cut out old, woody growth each spring as the first new stems and leaves begin to emerge. Remove up to one-half of the old stems completely by cutting them off at their base. Trim back the remaining stem 8 inches, or by about one-third their length. Dispose of the trimmings.
**Trim off the small flower buds as they begin to form in late spring or early summer. Flowering causes the flavor of the sage to decline.
Prune back the stems by up to 8 inches in summer, approximately 75 days from planting or when growth resumes on perennial plants. Save the trimmings for herbal use.
 Shear back the sage a second time in late summer or early Autumn, once the stems and foliage have regrown from the previous pruning. Remove up to 8 inches from each stem.
 Conflicting information - happens for just about every plant....


21-9-18 
Oregano, Thyme and Garlic Chives are growing really well, the Dill died and am testing if the pot of parsley will like the new location (was previously in the nursery - reclaimed from an Aldi fresh herb bundle.)
Sage is leggy and distressed.  After researching the info above I will prune heavily.  There are two new plants starting off on the right hand side of the plant, difficult to spot behind the taller stalk, one self layered, one I encouraged.
Will wait until a bit larger and cut off the stalk and pot up as a gift
2nd week in Sept was fertilised with Osmacoat.


 22-9-18  
Well, how embarrasing.  Not a water problem for the sage.
More like garden monsters, multiples.

And did I read somewhere that these large wooly blighters are good guys? boy do I need to learn!!!!
So, a short sharp cut back on almost every stalk, there are signs of tiny little leaves emerging further down the stalks and new growth from the center of the plant, so not too concerned about photosynthesis.  Made up some white oil and dowsed the entire plant.

20-10-18
 Success with the sage, everything is going along nicely, the parsley likes to position so will soon pot up into a large pot.
However.....look at the thyme...lots of dieback....natural?  bug?
The journey continues.

TOMATOES, seeds and seedlings

Tomato
Pot Prize or Lycopersicon esculentum
'Pot Prize' is an early maturing tomato that produces medium sixed flavoursome fruit its compact habit makes it ideal for container growing.  Tomatoes prefer an open, sunny, frost-free position with well drained friable soil.  Fertilise generously.  Keep well watered in warm weather.
Position - Full sun
Height - 50cm
Plant - 50cm aprar
Maturity 9-10 weeks
Uses - Salads, sauces, hot dishes, preserving.

Purchased a punnet from Bunnings to get a head start.  They were approx 1.5" H when purchased and grew to approx 4".  Removed the bottom two lots of leaves and planted to cover.
7-10-18 

21-9-18 
Plant #1
Planted into large round pot with Basil
22-10-18
The tomato seedling planted with the basil is doing so much better than the other 3 seedlings, why? being put straight away into a larger pot? being planted with the basil? a larger pot holds more readily available water? or fertiliser?


21-9-18
Plant #2
Planted in 4" sq nursery pot
22-10-18
One month after placing in 4" pot, roots have grown to edges of pot
Repotted into grow pot with half trowel of Tomato Organic Fertiliser, removed 2nd lot of lower leaves that had been damaged by rain and planted deeper in pot with stake.


21-9-18
Plant #3
Planted into 5" blue nursery pot
22-10-18
Trimmed off lower leaves and planted deep in a grow pot with half a trowel of Organic Tomato Fertiliser.

Plant #4
Planted in 7" black nursery pot
22-10-18
Transferred from Black 7" round to Grow Pot, fertilised with Tomato Organic Fertiliser, and for the second time, removed lower leaves that had been affected by rain and burried tomato deeper.


30-8-18
Seeds, planted in 7" black nursery pot 
seeds from Aldi - Tomato sweet cherry
Heavy crops of small sweet fruit
A taller variety that requires staking
Harvest when red and ripe---so lots of info on that pack
 Hope the blurry pic isnt a jinx on what is to come....

7-10-18
Tomato plant with Basil is doing better that others in smaller pots, despite smaller pots getting more sun.  Have made space in the one 'Sun' spot by the pool fence for 3 small pots and the basil/tomato pot.


TOMATO HEIRLOOM SELECTION
'Sunrise Bumble Bee'
Vibrant and juicy, these tomatoes are like little garden jewels, especially when eaten fresh from the vine.  Another artisan tomato like 'Pink Bumble Bee', 'Sunrise Bumble Bee' was bred in the us and is a modern, open pollinated heirloom.  It holds well on the vine, so you can pick them fresh each day.  As sweet as 'Tommy Toe' and more striking thant 'Tigerella' this tomato is suitable for pots or garden beds.  Chefs love the colour and flavour.
Growing Tips
Plant tomato seedlings out when soil temperature reaches 15C or more, and after risk of frost has passed.  Plant in full sun and enrich the soil with compost and well rotted manure.  In pots use a premium organic potting mix.  Mulch and water regularly. especially during hot weather.  Stake at planting.
Full Sun
150cm H x 60cm W
10 weeks to Harvest

7-10-18
Purchased from Bunnings, removed lower leaves and potted into Grow Pot with support canes.
really should have removed higher leaves, because when the rains hit, so did the soil virus.

 20-10-18
Plant is damaged from rain splatter.